Bring up the first lab router
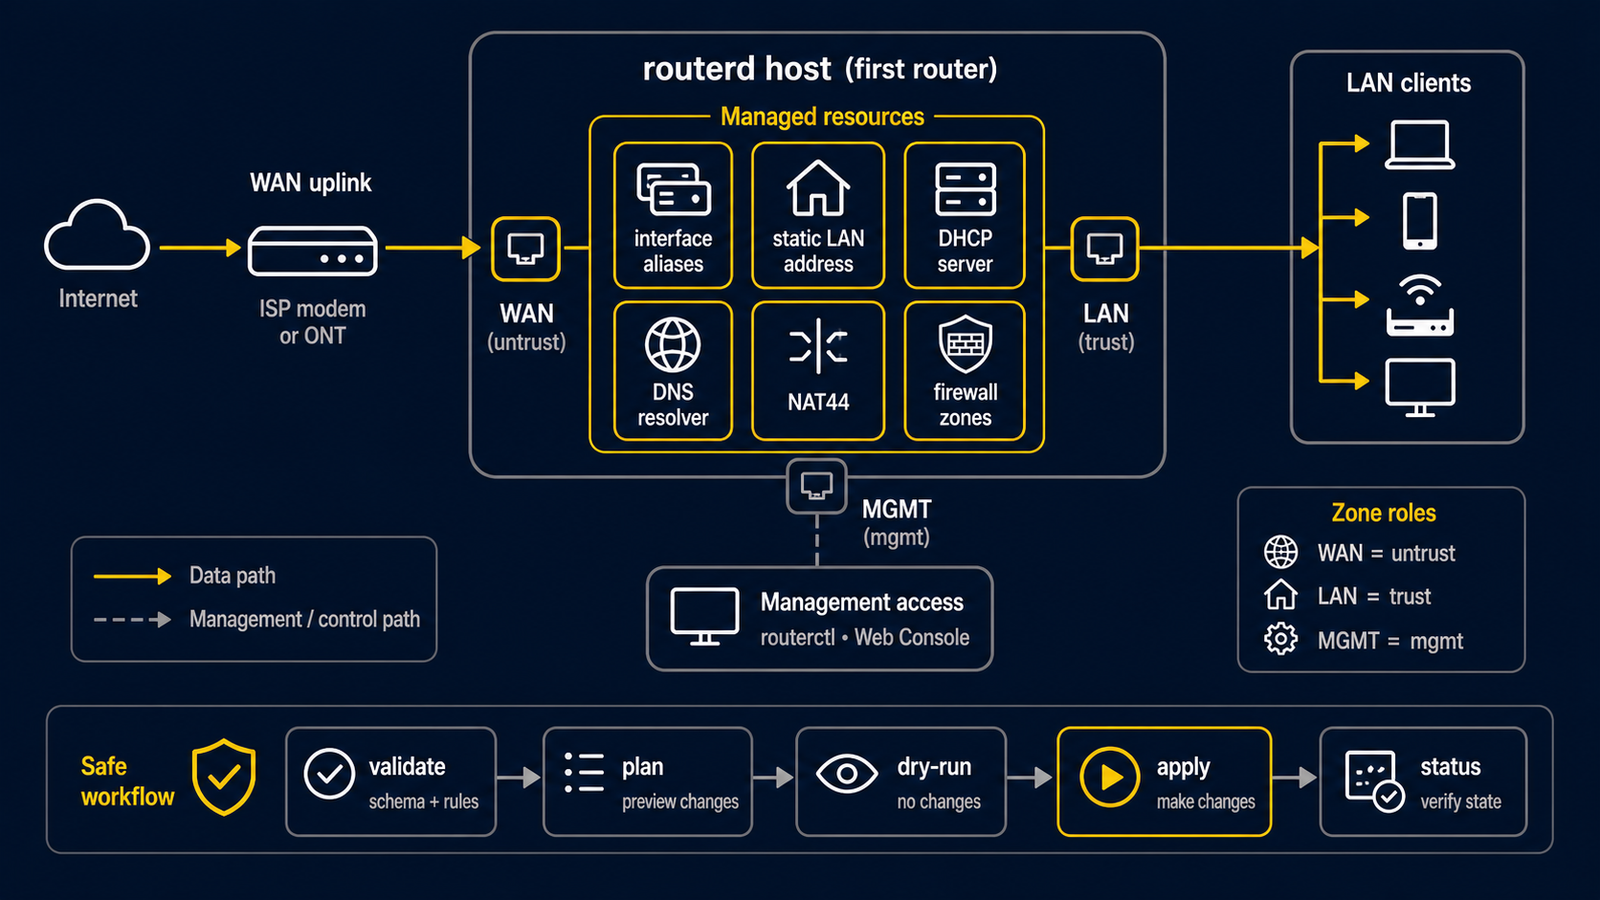
This tutorial gives an isolated LAN client a private IPv4 address, a gateway,
and an IPv4 path to an upstream network. It uses the complete example
examples/example-basic-ipv4-nat.yaml.
It is a lab tutorial, not a copy-and-paste replacement for a household router.
Use a VM console, serial console, or a separate management NIC. ens18 and
ens19 below are example names. Check yours with ip -br link, and never
guess which interface carries the management connection. The example uses the
private range 192.168.10.0/24; change it if it overlaps with an upstream,
VPN, school, or management network.
Before you start
- Install routerd using Install and upgrade.
- Use an Ubuntu Server lab host with two distinct WAN/LAN interfaces, plus a
console or independent management path. Identify them with
ip -br link. - Connect WAN to an upstream DHCP network with Internet access. Connect LAN only to an isolated switch/bridge and a test client; no other DHCP server should serve that LAN.
- Keep a sudo-capable login and Internet access for the download. The client checks below use Linux commands.
- This is a first-install path with
routerd.servicestopped. If it is already running, do not run a second live one-shot apply alongside it. After reviewing the candidate, usesudo routerctl plan -f first-router.yaml --replaceandsudo routerctl apply -f first-router.yaml --replacefrom the lab console instead of step 3. Full replacement removes resources omitted from the file; do not use a lab file to replace a production configuration.
What success looks like
upstream network -- WAN -- routerd host -- LAN -- test client
                         DHCP + NAT
- The upstream gives the WAN an IPv4 address with DHCP.
- The router gives the LAN test client an address from
192.168.10.100to192.168.10.199. - The test client uses
192.168.10.1as its gateway. - NAT lets the client send IPv4 traffic through the one upstream address.
Read Network basics if words such as DHCP, gateway, or NAT are new.
1. Download and adapt the complete lab file
# The installed release contains router.yaml.sample, not every repository example.
# Download the example from the same release as the installed routerd binary.
ROUTERD_VERSION="$(sudo routerd version | awk '{print $2}')"
curl --fail --location --output first-router.yaml \
  "https://raw.githubusercontent.com/imksoo/routerd/${ROUTERD_VERSION}/examples/example-basic-ipv4-nat.yaml"
If you already have a checkout at that same release tag, you can instead copy
examples/example-basic-ipv4-nat.yaml from the checkout.
Open first-router.yaml and change only these values before the first preview:
Interface/wan.spec.ifname: the lab WAN interface name.Interface/lan.spec.ifname: the isolated LAN interface name.192.168.10.0/24, if it conflicts with any connected network.- The public DNS servers if your lab must use different resolvers.
The file deliberately leaves the WAN externally owned and lets routerd manage the LAN. It includes a DHCPv4 server, a NAT44 rule, and basic zone resources.
routerd's firewall resources are groundwork, not a security certification. Do not expose an Internet-facing router or rely on this example as the only security boundary. Keep the first exercise behind an isolated virtual switch or physical lab network.
2. Validate and preview before a daemon exists
sudo routerd validate --config first-router.yaml

LAB_DIR="$(mktemp -d)"
sudo routerd apply --config first-router.yaml --once --dry-run --skip-service-manager \
  --state-file "$LAB_DIR/state.db" \
  --ledger-file "$LAB_DIR/ledger.db" \
  --status-file "$LAB_DIR/status.json"
rm -rf "$LAB_DIR"
These commands do not commit a network change. A validation failure is a reason to edit the YAML, not to try a live apply.
3. Apply from the console
When the preview names the expected interfaces and artifacts, make the change from the console or a separate management path:
sudo routerd apply --config first-router.yaml --once
Start the service before the status and client checks, even for a temporary
lab. A one-shot apply exits without leaving a daemon for routerctl. Copy the
reviewed file into the installed location and start the service:
sudo install -d -m 0755 /usr/local/etc/routerd
sudo install -m 0600 first-router.yaml /usr/local/etc/routerd/router.yaml
sudo systemctl start routerd.service
sudo systemctl is-active routerd.service
Continue only after the service reports active. To start the lab router
automatically after a reboot, optionally enable the service:
sudo systemctl enable routerd.service
4. Check the whole small path
On the router:
sudo routerctl get status
sudo routerctl describe DHCPv4Client/wan-dhcpv4
sudo routerctl describe DHCPv4Server/lan-dhcpv4
sudo routerctl describe NAT44Rule/lan-to-wan
On a client connected only to the lab LAN, renew its DHCP lease, then check:
ip route
ping 192.168.10.1
curl -I https://example.com/
If the final command fails, separate the problem: first check that the client received an address and gateway, then that the WAN lease exists, then DNS. Do not keep applying the file repeatedly while the cause is unknown.
Next
- Basic IPv4 NAT gateway — a guided explanation of this file
- LAN-side services — make the router answer local DNS names and add IPv6 only after IPv4 works
- Basic NAT and firewall policy — current firewall scope and safer next steps
If startup or status fails, use Troubleshooting before trying another live apply.